


Today, I'm sharing a dress I made with the lovely Belgian voile she sent.
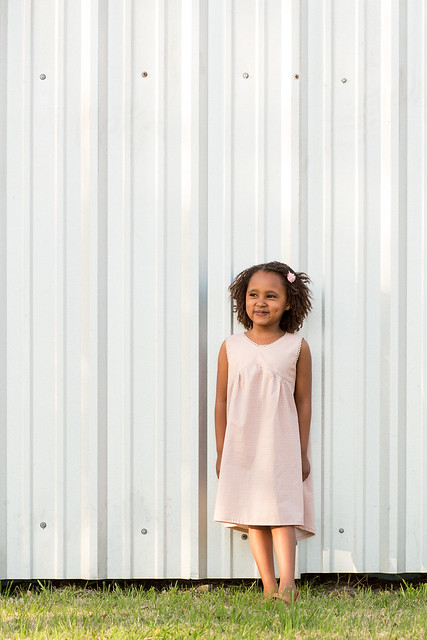
The voile has such a nice, floaty drape and the pale pink compliments Tia's caramely chocolate skin so beautifully. Great choice, An! :)

The dress is made from another Happy Homemade: Sew Chic Kids pattern (Project J). I love the lines of bodice and the gentle gathering. I hadn't seen anything like it. I really can't get enough of this book!

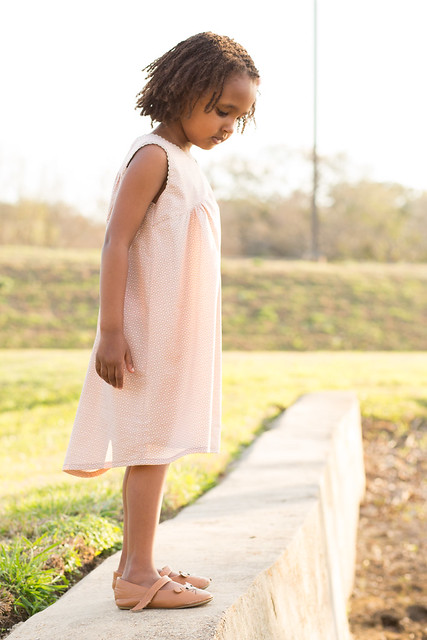
I did go rogue and construct the dress differently than the pattern instructed. The dress was not supposed to have any facings or linings and instead you finish the edges with a serger or zig zag stitch and tack lace over the top to hide the stitching.

I couldn't envision that working well at all. Voile seems too flimsy to stand alone as a completely unlined bodice. So I put the dress together a lot like the Oliver + S Ice Cream dress, which has a lined yoke and a button closure in the back. Oliver + S can't be beat for their superb instructions.

If you do it this way, you will need to bind the back armholes before you sew the bodice to the skirt.

The size 4 was too long for Tia (who's on the small side, for sure). The extra length lent itself well to finishing the dress with an asymmetrical hem. And that's what I did. Flowy and breezy and just right for our hot summers.
And our springs, too, when paired with a cardigan... only when necessary. :)
As it turned out, An had this very same voile in her stash. She suggested that we each create something with it and share what we made on the same day. So, today An is showing you her voile dress for her darling baby, Ava.

Isn't Ava gorgeous? She reminds me of Snow White. You can read all about her new dress here.
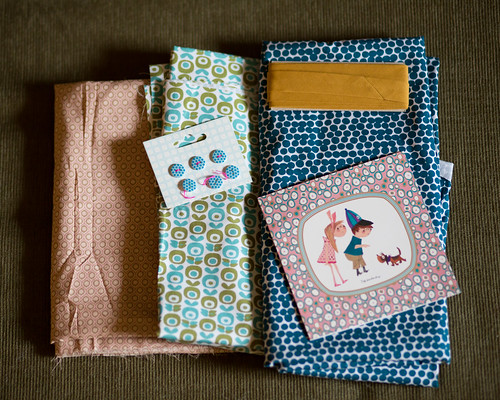
Also, I don't think I blogged about the package I sent as part of Mailbox Surprise. My receiver was Suz of Sewpony and I put this package together back in late November/early December.
I sent a brushed cotton with large pink dots from Spoonflower, which I found on Suz's fabric inspiration Pinterest board here. Inspired by this pin of hers, I sent the navy print with white dots, and then some Dear Stella confetti dots in Emerald. I also sent two metallic bias bindings that felt festive for the holiday season and some crocheted lace.
She used all three fabrics and blogged about them here and here.


gorgeous dress! love the details: sweet button!
ReplyDeleteLovely dress, Rachel!
ReplyDeleteLike you, when I look at SKC book I feel like making every single project!
Thank you for mentioning once again our series!
Of course, Marta, and thank you so much for including me! It was so much fun!
DeleteOoooooh. So pretty. I absolutely love this fabric - the soft peachy pink, the little print, the adorable and subtle lace trim. It's all very Alicia Paulson to me (and I adore her taste - I can never decide if I should just jettison my oranges and yellows and start sewing only in calicos - but the oranges and yellows always call me back).
ReplyDeleteYou know, I have this book, but I haven't been sucked in yet. Maybe when I finish trying to sew all the o+s, I'll get started on some Japanese sewing books (or shoot, Ottobre? I have kid patterns coming out my EARS!). Too many projects, too little time!! Seriously!
oh the fabric is really beautiful with her skin color, you're right! love the trim you added, too.
ReplyDeleteIt's beautiful Rachel, as is Tia. I take the same approach to Japanese patterns and try to make them a bit more like Oliver + S patterns too!
ReplyDeleteBeautiful, and lovely photos as always. Great idea to line the bodice - and I like the asymmetrical hem, too.
ReplyDeleteAck! I love this! I have this pattern book as well and have studied the diagrams over and over trying to figure out how they finished the arms/applied the lace. Love your solution for solving this. So bear with me: if I cut a lining for the bodice from the same pattern pieces and followed the Ice Cream Dress instructions for putting it together, it would work as wonderfully as yours? It looks just stunning on Tia - a very good choice for your fun mailbox surprise!
ReplyDeleteExactly - instead of cutting only the front and back bodice pieces, you will also cut another set for the lining. Be sure to add the seam allowance, since that's not added in the diagrams. I added a 3/8" seam allowance, except on the back where you add the button and button loop. There I used a 1/2" seam allowance so that it would work with O+S button loop and instructions. By the way, the O+S instructions tell you to cut the loop to be 2 inches long, even though the pattern piece is 3 inches long. (I messed that up once by not reading carefully enough and my loop was too long! :) Oh and one other thing: when joining the bodice to the skirt, I reversed the way O+S has you do it. I sewed it to the right side first (bodice + skirt right sides together) then I pinned the lining over my stitching line, and topstitched. This resulted in an even nicer/cleaner finish than the way Liesl has you do it, in my opinion. Oh and be sure you bind the back armholes or that edge won't be finished. Make sense?
DeletePerfect sense! You are such a good "explainer":) Thanks for your thorough reply - super helpful. Now if it EVER gets warm enough here in Michigan to wear something without sleeves this will be at the top of the to-sew list. Though I suppose a cute cardigan could help with the bare arms:)
DeleteI love this dress!! I have the same book too, so I'll have to give it a go.
ReplyDeleteOh I love this dress! I could never getup the nerve to make it before, because of how the dress is finished - and it doesn't help that I have the Japanese version of this book! Your solution is great!
ReplyDeleteThis is just a sweet dress. Just so sweet. The color, the softness, the trim. Oh la la!
ReplyDeleteWhat a sweet dress ad the color is perfect on Tia! I'm itching to get back to this book. But the fact that it goes to a size 8 and my Oliver + S patterns go to either 3T or 4T is pushing them up on my to-sew list right now. I look forward to going back to all your sewing for inspiration!
ReplyDeletethis trim? perfection!! i'm drooling over it. (and glad i'm catching up on your makes!)
ReplyDelete